Brass Magic and the Logo

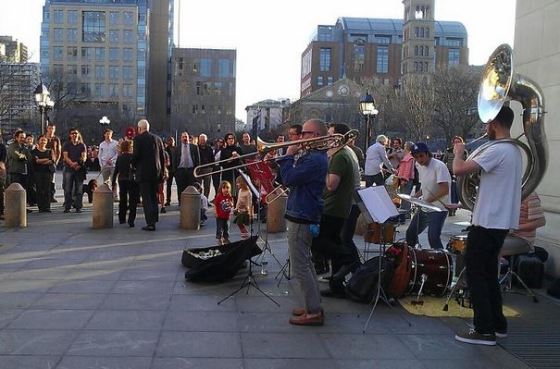
Brass Magic in Washington Square

Daniel Lubin from Brass Magic asked me to make his album cover art. You can see them above busking in Washington Square Park in New York City. I wanted to capture the energy of the band and make a logo that felt like the sound of the horns but also to give them some brand identity. The lead musician Daniel Lubin is a Tuba player so we decided to go with the logo of the tuba as a representation of his spirit and influence, but to also give you the sense that this is no doubt a horn playing funky brass band!

Brass Magic Coin

The final logo for Brass Magic

Brass Magic 2 Horns

This was an early idea for the Brass Magic Logo that didn’t make the cut

Brass Magice 3 Horns Black and White

I like this one in black and white! I think the fonts are nice too!

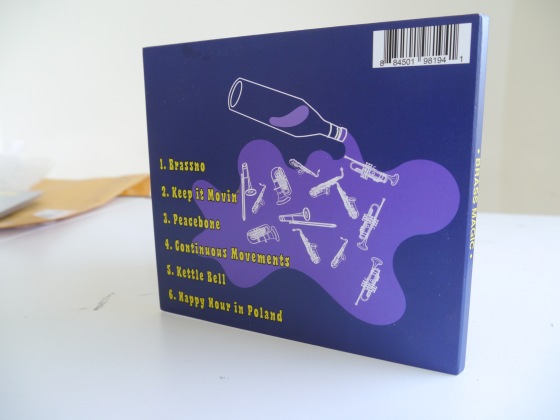
Daniel Lubin and the Brass Magic guys wanted something festive so we went with a guy holding a bottle of Vodka for the album cover and also maintained the two tubas logo on the inside of the cover.

Album Cover

Front cover to the CD

P1170637

Back Cover of the CD

No Knead Bread Recipe

The Left bread is without a bread basket, the right bread is with a bread basket.

The Left bread is without a bread basket, the right bread is with a bread basket.

For the last year my wife and I have been making homemade bread. We used to get our bread from Acme bread bakers in Berkeley, California which we really loved. When we moved to New York City we looked for bread in the neighborhood here in the Morningside Heights and we couldn’t really find anything we were excited about. We then tried a few recipes until we came across this recipe on Shutterbean (Incidentally, Shutterbean is one of the best recipe sites we’ve come across on the internet!) which featured Jim Lahey’s (founder of Sullivan Bakery) recipe for the No Knead Method of baking bread.

I would say this has to be one of the most sturdy bread recipes we’ve used. This means that the bread as it rises can be left for longer or shorter periods of time depending on the humidity and the second rise, which makes the bread a flexible option for those on the go and too busy to make the bread at the exact moment in time that the recipe suggests. With that said, it is important to know that bread is not an exact science. It’s more about being aware of what your dough is doing during the first and second rise because the conditions of humidity and temperature can have a lot to do with the way the bread comes out.

A good heavy iron pot with a lid on it or a Dutch Oven or in our case we used two medium sized iron pans to bake the bread in. One as a bottom and the second as a top with enough room for the bread to rise in the oven. It’s important to not let the bread touch the top because it might burn.

Adding the optional ingredients to the dough will change the personality of the bread but it will be an equally rewarding and delicious experience. We sometimes add raisins to this recipe but we often add chopped olives, and rosemary. I’m pretty sure you can get creative with what you can fold into this dough. Perhaps the possibilities are endless!

Ingredients

3 Cups of flour

1 1/2 Cups of Water

1 1/4 teaspoons of salt

1/2 teaspoon of dry yeast

cornmeal or oatmeal or wheat bran or flour to dust the pan and the top of the bread so it doesn’t stick.

Optional Ingredients

1/2 cup of coarsely chopped walnuts

1 cup of raisins

1/2 cup of  olives split in half and without pits

a handful of chopped rosemary

Optional Tools

A bread basket for the second rise

First add the flour, salt,and yeast together in a medium sized mixing bowl and mix thoroughly. You can also add your optional ingredients in this step too. Next add the water and mix until you’ve been able to get the water evenly distributed through the dough. It should be sticky but not watery. Cover the bowl and let rise for about 18 hours. This step is important but the time can vary depending one the temperature, and humidity. You can slide the time around a bit here depending on your work/school schedule and how the bread is rises. After a little experience you’ll be able to use your best judgment. After the first rise carefully add a small handful of flour to cover the dough. Gently take the dough from bowl and carefully mold the dough into a ball. Do not compress the dough because you want to make sure that there are gas pockets from the yeast that will give it that rustic texture! lightly flour the bowl or bread basket and leave it to rise a second time for 90 minutes. Turn your oven on for a half an hour at 475 degrees F. During the thirty minutes that the oven is heating up, put your pot in the oven (This will ensure that your results will be a good crusty bread). Pull your pot from the oven and quickly dust the bottom pan with cornmeal or oat bran or Oatmeal or flour.  Take the dough from your basket or bowl and gently land it onto the hot bottom pan or pot. Quickly cover it and place back into the oven. Cook for thirty more minutes with the lid on and another 15 minutes with the lid off to darken the crust of the bread. Afterwards carefully pull out the bread from the pot and let it cool. Voila, rustic bread!

 

Chez Panisse Restaurant and The Famous Bunya-Bunya Tree

Chez Panisse Restaurant

Most recently in the news, Berkeley California’s Chez Panisse Restaurant has been damaged by a fire. When I heard the news I was immediately shocked! Soon afterwards many of my friends contacted me to tell me the bad news. Of course I checked the news and there it was on the computer screen on Shattuck Avenue all cluttered with fire engines and news reporters.

I hear it will look different because they had to replace the front porches. I am sure something exciting is coming our way! I also hear it will re-open in June just in time for those wonderful summer salads.

Off the top of my head I would say my favorite salad is the butter lettuce salad with roasted beets and green goddess dressing. Oh but there are so many beautiful salads there! My mouth is watering from my memories! What’s your favorite salad at Chez Panisse?

I took the time to make an image of the restaurant and the Bunya-Bunya tree to meditate on the place,to remember all the wonderful staff meals I’ve eaten there and the great moments I’ve had there. I learned so much from this place and I am truly lucky to have been a part of it. In fact it’s still a part of me every time I make a vinaigrette for a salad, grill a hanger steak, or take half the day to make a cassoulet.  The spirit of Chez Panisse is still with me and I take it wherever I go.

Besides the food, the other great thing about Chez Panisse are the people that work there. They are the real heart and soul of the restaurant’s daily life. A most amazing group of people that I find myself missing here on the East Coast. If it wasn’t for this wonderful group of people that work there it just wouldn’t be the same place.

Meyer Lemons Madness

Of course most of you know I used to work for Chez Panisse and I like cooking as much as I like making art. Here’s a drawing exercise while I am working on some illustration work for a new farmers market opening in the Uptown District of Oakland, California. These are Meyer Lemons. They are the source of acidity for many of the foods we would make when I lived in Oakland because these little fruit grow just about everywhere and practically all year there. I find these in the markets here in New York but never quite as good as when you can pick them off of your own tree in your garden.

Here’s a Meyer Lemon Tart recipe from the New York Times:

Meyer Lemon Tart

TOTAL TIME
1 hour (plus 1 hour for chilling the dough)

Ingredients

  • 13 1/2 ounces (3 sticks plus 3 tablespoons) unsalted butter, softened, plus extra for greasing pan
  • 1 1/2 cups sugar
  • 8 large egg yolks
  • 1/2 tablespoon milk
  • 12 ounces (about 2 1/3 cups) all-purpose flour
  • 1/4 teaspoon plus 1/8 teaspoon salt
  • 1 1/4 pound (5 or 6) Meyer lemons
  • 5 large eggs

Preparation

1.
In the bowl of a mixer, cream together 8 ounces softened butter (2 sticks) and 1/2 cup sugar. Add 1 egg yolk and the milk, and beat to combine. In a medium bowl, combine the flour with 1/4 teaspoon salt. Slowly add the flour to the butter mixture, stirring until completely blended. Gather dough into two balls. Freeze one for future use, chill the other for at least 1 hour.
2.
Heavily butter a 10-inch tart pan with a removable bottom. On a lightly floured surface, roll out the dough to a circle 1/8-inch thick. Transfer to the tart pan, press into the pan and trim the edges. Prick the bottom with a fork, and place the shell in the freezer for 30 minutes.
3.
While shell is in freezer, prepare lemon curd: grate zest of lemons. Squeeze lemons to extract 1 cup of juice. In a medium nonreactive saucepan, combine juice and zest. Add remaining 1 cup sugar, remaining 5 1/2 ounces butter and 1/8 teaspoon salt. Place over medium heat, stirring once or twice, until sugar is dissolved and the butter is melted.
4.
In bowl of a mixer, combine eggs and remaining 7 egg yolks until blended. Slowly add hot lemon mixture to eggs until blended. Return mixture to saucepan, and place over low heat. Whisk constantly until mixture thickens to a pudding like consistency; do not allow it to boil. Remove from heat, and continue to stir to stop the cooking. Strain lemon curd into a bowl. Adjust sugar to taste; the curd should be tart, but may need additional sugar if the lemons were unripe. Cover with plastic wrap, pressing it right against the surface of the curd. Allow to cool.
5.
Preheat oven to 375 degrees. Remove tart shell from freezer, and bake until lightly golden, 20 to 25 minutes. Remove from heat and allow to cool slightly. Spoon lemon curd into tart shell, and smooth the top. Bake until filling has puffed around the edges, about 30 minutes. Cover edges with foil, if necessary, to prevent over-browning. Cool to room temperature before serving.